Installation of RoundCube mail client on Linux
This is a step by step tutorial for installation of your own RoundCube mail client, it is in continue to my recent Postix server installation post.
[Download DOCX version] [Download PDF version]
Install the required php libraries and applications
RoundCube is using certain php libraries which you need to install / confirm that they are installed. On php 7.2 these are:
sudo apt-get install php7.2-gd php-mysql php7.2-curl php7.2-zip php7.2-ldap php7.2-mbstring php-imagick php7.2-intl php7.2-xml php-fpm
On php7.0 these are:
sudo apt-get install php7.0-gd php7.0-curl php7.0-zip php7.0-ldap php7.0-mbstring php-imagick php7.0-intl php7.0-xml php-fpm
On other php versions you can change the pckaging number accordingly. We also need to install a couple of additional applications (if not installed on your server):
sudo apt-get install spamassassin spamc unzip wget curl
Once all the packages are installed, you will need to change Timezone setting in php.ini file. You can do this by editing /etc/php/7.0/php.ini with your favorite text editor. Edit or add the following line to read:
date.timezone = Pacific/Auckland
Note: if time zone test failed later on, update this variable at /etc/php/7.0/fpm/php.ini
This is important as it sets the timezone for when emails are sent and received. Now we need to install the Roundcube webmail client. First we need to download the roundcube files:
cd ~

wget https://github.com/roundcube/roundcubemail/releases/download/1.3.10/roundc

Ubemail-1.3.10-complete.tar.gz

tar -xvzf roundcUbemail-1.3.10-complete.tar.gz

rm roundcUbemail-1.3.10-complete.tar.gz
The above downloads the Roundcube source files and extracts them to a directory that will be titled roundcubemail-1.3.10 . The next commands depend on you wish to setup your apache configuration, and this guideline assumes the default webroot of /srv/www/public/mail.yourdomain.com – note that my common apache configuration is different to the default one (/var/www/html) and follows the following LAMP stack build guide.
Create the public folder:
sudo mv roundcubemail-1.3.10 /srv/www/public/mail.yourdomain.com

sudo chown -R www-data:www-data /srv/www/public/mail.yourdomain.com

sudo chmod -R 775 /srv/www/public/mail.yourdomain.com
The above moves the roundcube source to the webroot directory and changes the ownership of the files to the user www-data . Now we need to setup the MySQL for use with the Roundcube webmail client. Log into MySQL with
mysql -u root -p
and enter your password that you used to secure the installation. If it does not work, try again and just press enter instead of entering your password. This would mean that the host is not setup properly in MySQL (common in Debian). Once logged in, enter the following:
CREATE DATABASE roundcubedb;

CREATE USER 'roundcube'@'localhost' IDENTIFIED BY 'password';

GRANT ALL PRIVILEGES ON roundcubedb.* to 'roundcube'@'localhost';

FLUSH PRIVILEGES;

exit;
If the GRANT command failed, try to use the following:
UPDATE mysql.user SET authentication_string = PASSWORD(password') WHERE USER = 'roundcube' AND Host = 'localhost';
And then do the FLUSH command.
Make sure to change the password here to something secure and memorable. Now we’ll need to let roundcube know what the database name and password is for the setup. Enter the following:
cd /srv/www/public/mail.yourdomain.com

mysql -u roundcube -p roundcubedb < SQL/mysql.initial.sql
Make sure to enter the roundcube user password that you used just before. If this command failed, use the following with the root password:
mysql -u root -pROOT_PASSWORD roundcubedb < SQL/mysql.initial.sql
Now we need to setup Apache to serve the application on our mail server. From here on, this guide assumes the domain name of the server is mail.example.com , obviously, this will be different for you. I usually do not follow the default apache configuration in order to simplify things, so please use my guide “configure a virtual server on apache” at https://eran.ben-shahar.com/2019/01/27/configure-a-virtual-server-on-apache-quickguide/ to do so and skip the following section. Otherwise, if you follow the common apache configuration, use the following:
Setting up RoundCube virtual host
To access the mail client at your URL you need to setup Apache to serve the Roundcube folder from the webroot. Run service start apache2 to start apache if it’s not running and visit example.com or whatever your hostname is that points to the server that the mail client will be running on. You should be greeted with the default Apache startup page, which is good. Run the following commands, replacing your domain where necessary:
sudo rm /etc/apache2/sites-enabled/default

sudo touch /etc/apache2/sites-available/example.com.conf

sudo ln -s /etc/apache2/sites-available/example.com.conf /etc/apache2/sites-enabled/

example.com.conf
The above creates a file called example.com.conf in the /etc/apache2/sites-available/ directory
and then creates a symlink of that file (like a shortcut in Windows) in /etc/apache2/sites-enabled/ .
We can now edit the file at /etc/apache2/sites-available/example.com.conf to say the following:
<VirtualHost *:80>

      ServerName example.com

      ServerAdmin admin@example.com

      Redirect / https://example.com

</VirtualHost>

<VirtualHost *:443>

      ServerName example.com

      ServerAdmin admin@example.com

      DocumentRoot /var/www/html/roundcube

      SSLEngine on

      SSLCertificateFile /etc/letsencrypt/live/example.com/cert.pem

      SSLCertificateKeyFile /etc/letsencrypt/live/example.com/privkey.pem

      Include /etc/letsencrypt/options-ssl-apache.conf

      SSLCertificateChainFile /etc/letsencrypt/live/example.com/chain.pem

     <Directory /var/www/html/roundcube>

           Options -Indexes

           AllowOverride All

           Order allow,deny

           Allow from all

     </Directory>

</VirtualHost>
The above creates two virtual hosts for example.com , one that redirects all HTTP traffic to HTTPS and HTTPS virtual host sets the document root and SSL certificate file locations. To generate an SSL certificate, we use certbot. Enter the following command, replacing your domain where applicable:
sudo systemctl stop apache2

sudo certbot certonly --standalone -d example.com

sudo a2enmod rewrite

sudo systemctl start apache2
When the certbot command is run, you’ll be asked with how to want to perform the verification test. Select option 1 to spin up a temporary webserver to perform the validation check (that’s why we stopped Apache, otherwise we can’t bind to port 80) and fill out any other information that certbot is asking for.
Once it’s complete and Apache is restarted, if you visit example.com now (your domain obviously), you should be redirected to an HTTPS version of your site and greeted with a screen from Roundcube saying the installation is unfinished.
Finishing the Installation and Configuring RoundCube
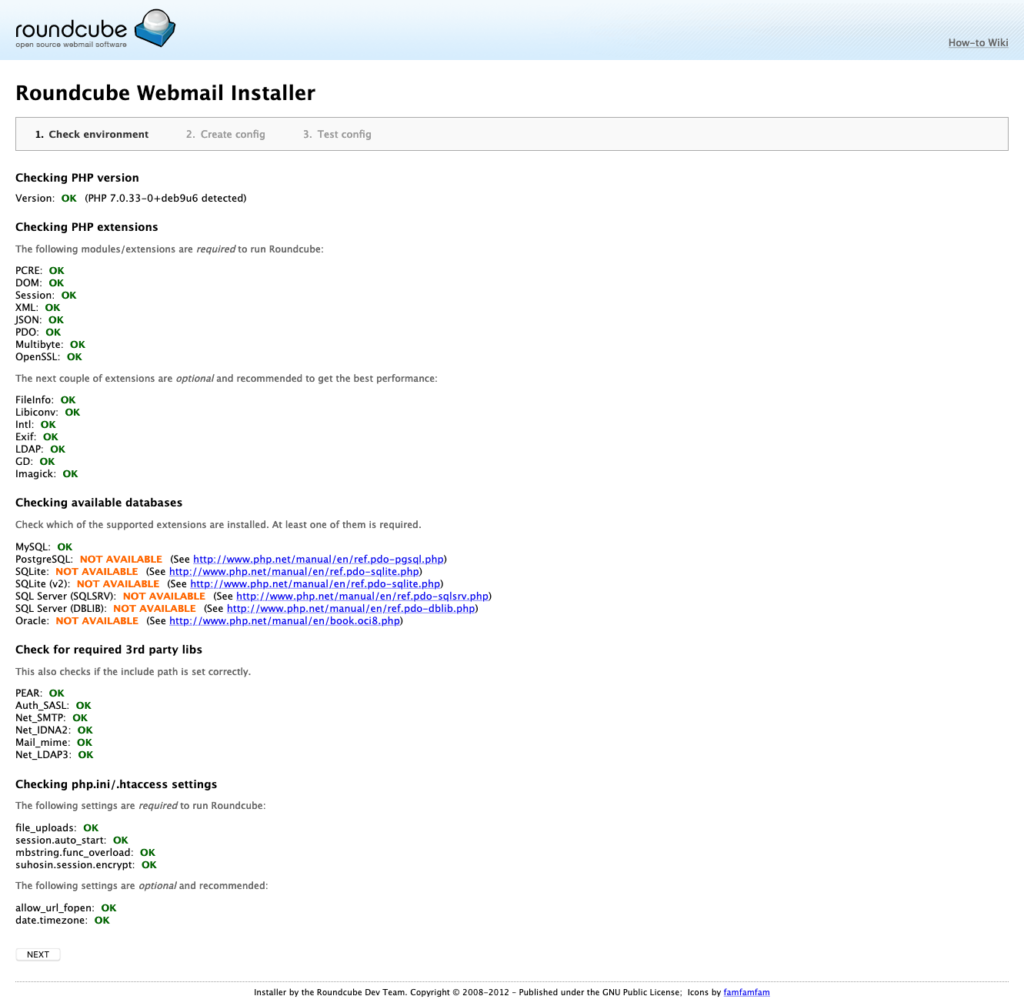
Now we visit https://example.com/installer to start editing the final config for Roundcube. Make sure the first section matches the following screenshots:
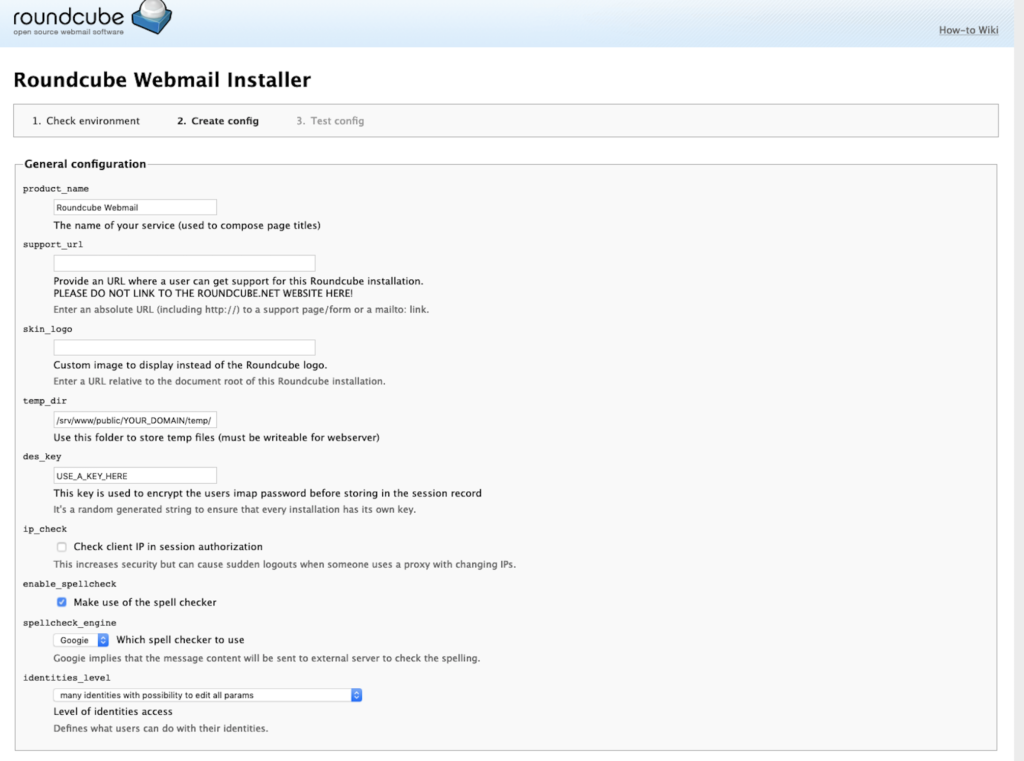
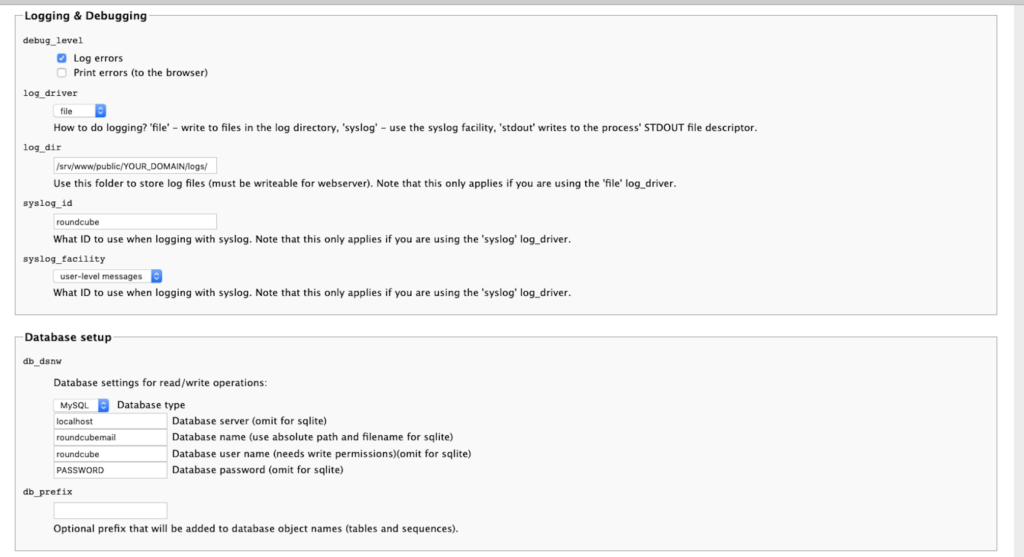
Click “Next” to get the configuration setup screen:
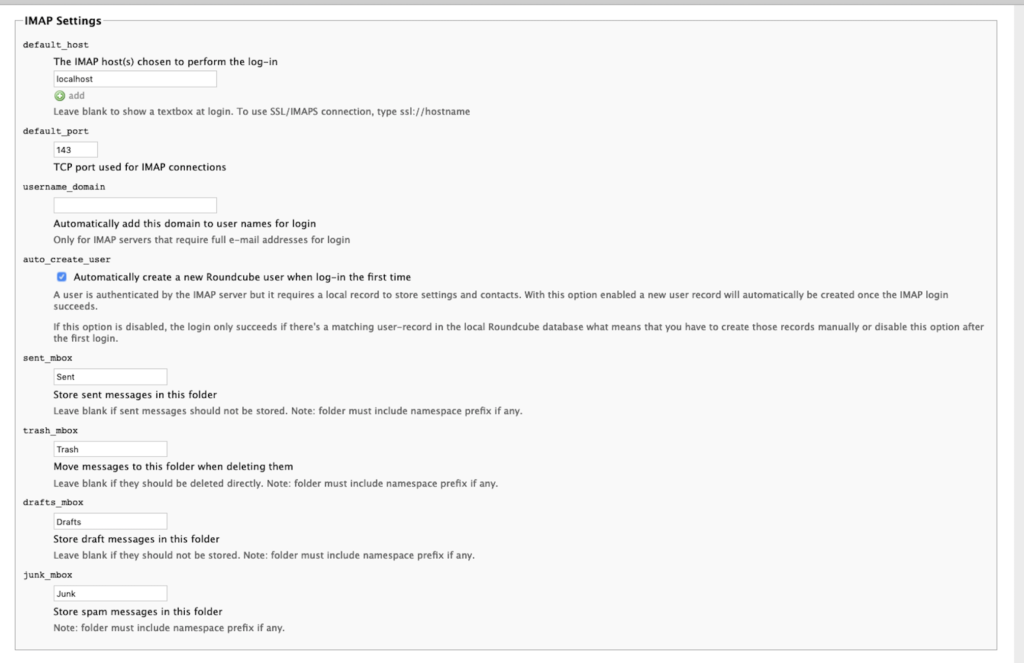
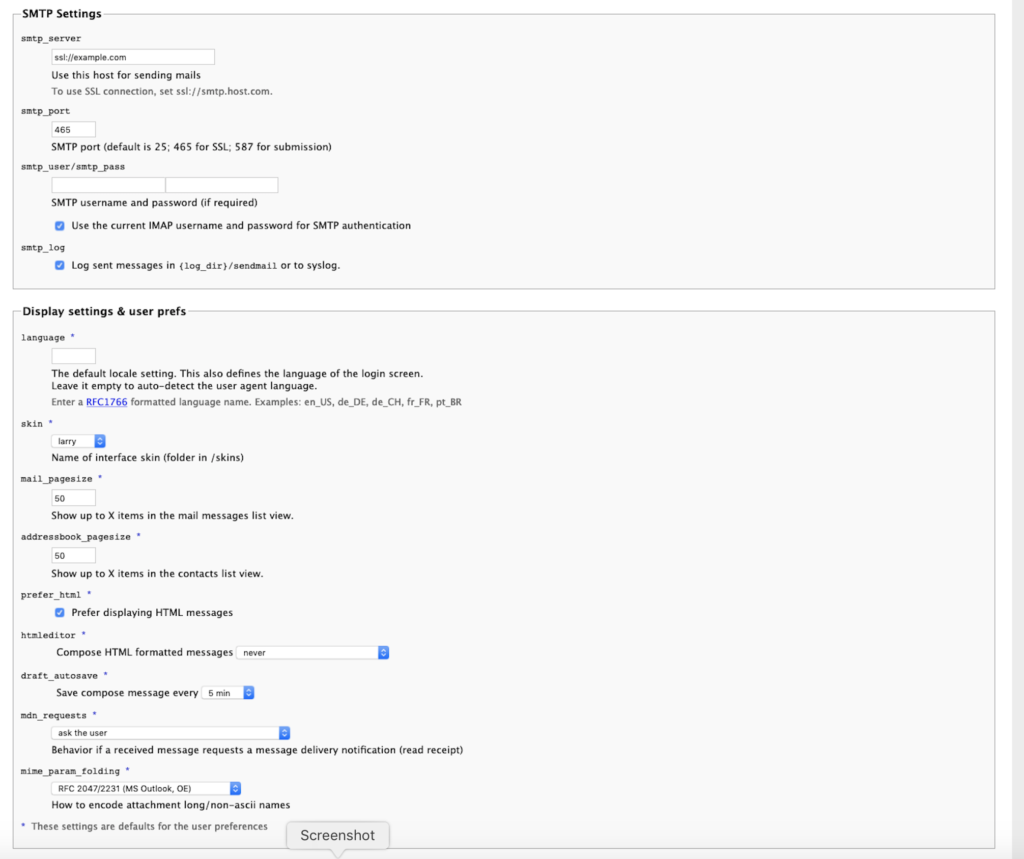
Note that the SMTP configuration requires our guide for setting up POSTFIX on Debian, with outgoing mails SMTP server.
Also choose plugins installation to your choice. If any conflicts later on, you need to re-configure the plugins list at /srv/www/public/mail.yourdomain.com/config/config.inc.php
Once you finished, click the “create config” button, you should then see the following page:

Clicking “continue” will cause roundcube to create an installation file. Once done, enter the installation file at /srv/www/public/mail.yourdomain.com/config or /var/www/roundcube/config and edit the following options:
$config['smtp_user'] = '%u';

$config['smtp_pass'] = '%p';

$config['enable_installer'] = false;

$config['mail_domain'] = '%d';
After completing the installation and the final tests please remove the whole installer folder from the document root of the webserver or make sure that enable_installer option in config.inc.php is disabled as described below.
These files may expose sensitive configuration data like server passwords and encryption keys to the public. Make sure you cannot access this installer from your browser.
Setting up the user accounts
The way RoundCube works, it uses the linux system users as mail users.
Note that multiple email address can map to a single user. Now you just need to create a system account for the
user by typing:
adduser username --shell=/bin/false
The above creates a system account for the user username and does not allow them to login into the shell. So basically it can only be used for mail.
Setting up virtual domains
Postfix will accept Emails for your default domain (the system hostname) by default. However if you want to add additional domains to accept emails, open and edit /etc/postfix/main.cf and add to it the following line:
virtual_alias_domains = domain1.tld domain2.tld domain3.tld
To execute the change, reload postfix and restart it:
sudo postfix reload
sudo service postfix restart
Setting up virtual emails and postfix mail forwarding
1. Edit /etc/postfix/virtual
This is a plaintext file where you can specify the domains and users to accept mail for. Each virtual domain should begin with a single line containing the domain name. The subsequent lines define addresses at the domain that are deliverable. Mail will be delivered to local usernames on the right side, as demonstrated in the example below. The condition @domain allows you to deliver “all other” mail to the indicated user. You can list multiple domains in this file; just repeat the format demonstrated below.
example.com.            this-text-is-ignored
postmaster@example.com  postmaster
address1@example.com.   destuser1
address2@example.com.   destuser2
@example.com.           destuser1
2. Edit /etc/postfix/main.cf
You have to tell postfix where to look for these virtual alias mappings; the appropriate configuration directive is in the main postfix configuration file. This tells postfix to use the db-format (hash) version of your virtual mappings. Note that your system must have db support for this to work; also, the actual db file is not created until you run ‘postmap’ in step 3.
virtual_alias_maps = hash:/etc/postfix/virtual
3. Refresh configuration and mappings
Since you’ve changed main.cf, you should restart the daemon. The second command below updates the virtual mappings; you must run this ‘postmap’ command when you change your /etc/postfix/virtual file. The ‘postmap’ command actually creates the hash db file that postfix looks for.
postfix reload
postmap /etc/postfix/virtual
Now try delivering mail to virtual domain addresses. If you encounter problems, check your mailer daemon system log and make sure your server configuration has been refreshed with ‘postfix reload’ and the ‘postmap’ commands.
Setting up Dovecot and Roundcube to allow mail forwarding
In the case you want to perform automatic mail forwarding, you have instal a new dovecot plugin and enable
the managesieve plugin in the Roundcube config files. First install dovecot-managesieved using:
apt-get install dovecot-sieve dovecot-managesieved
Then enable the sieve plugin support for dovecot-lmtp by adding the following to
/etc/dovecot/conf.d/20-lmtp.conf :
protocol lmtp {

postmaster_address = admin@example.com

mail_plugins = $mail_plugins sieve

}
If the file does not exist then create it, it will get included by dovecot.conf if dovecot.cont includes the line !include conf.d/*.conf
Then edit the sieve dovecot-plugin configuration at /etc/dovecot/conf.d/90-sieve.conf . Add the
following:
plugin {

sieve = ~/.dovecot.sieve

sieve_global_path = /var/lib/dovecot/sieve/default.sieve

sieve_dir = ~/sieve

sieve_global_dir = /var/lib/dovecot/sieve/

}
Now restart dovecot for changes to take effect:
service dovecot restart
Now you can test to see if the mailsieve is running properly by running:
telnet localhost 4190
If you get an output similar to:
Trying ::1...

Connected to localhost.

Escape character is '^]'.

"IMPLEMENTATION" "Dovecot Pigeonhole"

"SIEVE" "fileinto reject envelope encoded-character vacation subaddress compara

tor-i;ascii-numeric relational regex imap4flags copy include variables body eno

tify environment mailbox date index ihave duplicate mime foreverypart extractte

xt"

"NOTIFY" "mailto"

"SASL" "PLAIN LOGIN"

"STARTTLS"

"VERSION" "1.0"

OK "Dovecot ready."
You’re good to move on to the final step, enabling the managesieve plugin in Roundcube.
Roundcube Managesieve Plugin
Edit the roundcube config file at /user/srv/www/public/mail.yoursomain.com/config/config.inc.php or at /var/www/html/roundcube/config/config.inc.php and either find
and modify or add the following line:
$config['plugins'] = array('managesieve')
If there are other plugins enabled, don’t worry, just add managesieve as new element like:
$config['plugins'] = array('someotherplugin', managesieve')
Now restart apache with service apache2 restart and visit your roundcube mail web client.
Making sure Postfix is using the Dovecot Local Delivery Agent
This is so that postfix is no handling the delivery of mails on the system, and instead is handled by the Dovecot LDA. This allows the sieve rules that are created on the Roundcube frontend for each user to be executed before delivering mail, hence allowing operations like forwarding all mail and so on.
The only thing we need to do is to edit /etc/postfix/main.cf and add the following line:
mailbox_command = /usr/lib/dovecot/dovecot-lda -f "$SENDER" -a "$RECIPIENT"
Also make sure that mydestination and inte_interfaces are defined as follows:
mydestination = $myhostname, localhost.com, localhost, localhost.localdomain, localhost.$myhostname

inet_interfaces = mydomain.com , localhost
Now save and exit that file and run
postfix reload
and you should be good to go! This concludes the setup process of filtering, as it should now be working appropriately. Now we can actually set up filter rules in the Roundcube web client.
Configuring Mail Forwarding
You can configure your mail forwarding rules in the Roundcube dashboard, by selecting settings in the top right and selecting filters.
Configuration file sample
I attach our current /srv/www/public/mail.mydomain.com/config/config.inc.php file:
<?php

/* Local configuration for Roundcube Webmail */
// ----------------------------------

// SQL DATABASE

// ----------------------------------

// Database connection string (DSN) for read+write operations

// Format (compatible with PEAR MDB2): db_provider://user:password@host/database

// Currently supported db_providers: mysql, pgsql, sqlite, mssql, sqlsrv, oracle

// For examples see http://pear.php.net/manual/en/package.database.mdb2.intro-dsn.php

// NOTE: for SQLite use absolute path (Linux): 'sqlite:////full/path/to/sqlite.db?mode=0646'

//       or (Windows): 'sqlite:///C:/full/path/to/sqlite.db'

$config['db_dsnw'] = 'mysql://roundcube:p%26yCxk%24b52cJ3%25%2AX@localhost/roundcubedb';

// ----------------------------------

// IMAP

// ----------------------------------

// The IMAP host chosen to perform the log-in.

// Leave blank to show a textbox at login, give a list of hosts

// to display a pulldown menu or set one host as string.

// To use SSL/TLS connection, enter hostname with prefix ssl:// or tls://

// Supported replacement variables:

// %n - hostname ($_SERVER['SERVER_NAME'])

// %t - hostname without the first part

// %d - domain (http hostname $_SERVER['HTTP_HOST'] without the first part)

// %s - domain name after the '@' from e-mail address provided at login screen

// For example %n = mail.domain.tld, %t = domain.tld

// WARNING: After hostname change update of mail_host column in users table is

//          required to match old user data records with the new host.

//$config['default_host'] = 'localhost';

$config['default_host'] = "localhost";

// ----------------------------------

// SMTP

// ----------------------------------

// SMTP server host (for sending mails).

// Enter hostname with prefix tls:// to use STARTTLS, or use

// prefix ssl:// to use the deprecated SSL over SMTP (aka SMTPS)

// Supported replacement variables:

// %h - user's IMAP hostname

// %n - hostname ($_SERVER['SERVER_NAME'])

// %t - hostname without the first part

// %d - domain (http hostname $_SERVER['HTTP_HOST'] without the first part)

// %z - IMAP domain (IMAP hostname without the first part)

// For example %n = mail.domain.tld, %t = domain.tld

$config['smtp_server'] = 'ssl://mydomain.com';

// SMTP port (default is 25; use 587 for STARTTLS or 465 for the

// deprecated SSL over SMTP (aka SMTPS))

$config['smtp_port'] = 465;

// SMTP port (default is 25; use 587 for STARTTLS or 465 for the

// deprecated SSL over SMTP (aka SMTPS))

//$config['smtp_port'] = 465;

// SMTP username (if required) if you use %u as the username Roundcube

// will use the current username for login

$config['smtp_user'] = '%u';

// SMTP password (if required) if you use %p as the password Roundcube

// will use the current user's password for login

$config['smtp_pass'] = '%p';

// provide an URL where a user can get support for this Roundcube installation

// PLEASE DO NOT LINK TO THE ROUNDCUBE.NET WEBSITE HERE!

$config['support_url'] = '';

// This key is used for encrypting purposes, like storing of imap password

// in the session. For historical reasons it's called DES_key, but it's used

// with any configured cipher_method (see below).

$config['des_key'] = 'SOMERANDOMCHARACTERSHERE';

// This domain will be used to form e-mail addresses of new users

// Specify an array with 'host' => 'domain' values to support multiple hosts

// Supported replacement variables:

// %h - user's IMAP hostname

// %n - http hostname ($_SERVER['SERVER_NAME'])

// %d - domain (http hostname without the first part)

// %z - IMAP domain (IMAP hostname without the first part)

// For example %n = mail.domain.tld, %t = domain.tld

$config['mail_domain'] = '%h';

// Name your service. This is displayed on the login screen and in the window title

$config['product_name'] = 'Eranternet Webmail';

// ----------------------------------

// PLUGINS

// ----------------------------------

// List of active plugins (in plugins/ directory)

$config['plugins'] = array('example_addressbook', 'help', 'newmail_notifier', 'show_additional_headers', 'zipdownload' , 'managesieve');

// the default locale setting (leave empty for auto-detection)

// RFC1766 formatted language name like en_US, de_DE, de_CH, fr_FR, pt_BR

$config['language'] = 'en_US';