
Configure a website server on Apache – quickguide
In this quick guide I will configure a website on a pre-installed Apache server with SSL certificate issued by Lets Encrypt.
Prerequisites: a full stack Apache server on Linux, LetsEncrypt agent already installed (refer to the guide).
Step 1: delete the apache default site
I personally do not like the apache sites-available and sites-enabled structure, I think it is complicated and hard to manage when you got lots of virtual servers hosted on the same apache server. Skip this step if you disagree or follow those lines:
sudo rm -rf /etc/apache2/sites-enabled/*
sudo rm -rf /etc/apache2/sites-available/*
sudo rm -rf /var/www/html
Step 2: confirm the server listening to ports 80 and 443
Display or edit the /etc/apache2/ports.conf file to make sure it is listening to ports 80 and 443:
sudo nano /etc/apache2/ports.conf
You should expect to have this:
Listen 80

<IfModule ssl_module>
        Listen 443
</IfModule>

<IfModule mod_gnutls.c>
        Listen 443
</IfModule>

Step 3: create the www folder
Just create the folder where the site is going to be saved, and put there a blank index.html file for now:
sudo mkdir /srv/www
sudo mkdir /srv/www/public/
sudo mkdir /srv/www/logs
sudo chown -R www-data:www-data /srv/www
sudo chmod -R 770 /srv/www
Step 4: configure a http website
From this point in the manual, I assume that your server IP# is 100.200.300.400 , your domain name is my-site.com and your email address is info@my-site.com.
Create the site folder:
sudo mkdir /srv/www/public/my-site.com
You can transfer files to that folder or create a dummy index.html file with sudo touch /srv/www/public/my-site.com/index.html and sudo echo ‘Hello World’ >> /srv/www/public/my-site.com/index.html
After you transferred the site files, make sure they are owned by the Apache server username:
sudo chown -R www-data:www-data /srv/www/public
I personally prefer to put the virtual hosts configuration in one file /etc/apache2/all-sites.conf, if you prefer, use the sites-enabled and sites-available approach:
nano /etc/apache2/all-sites.conf
and add the following lines:
<VirtualHost 100.200.300.400:80>
        DocumentRoot /srv/www/public/my-site.com
        ServerName my-site.com
        ServerAlias www.my-site.com
        ServerAdmin info@my-site.com
#       ErrorLog /srv/www/logs/error.log
#       CustomLog /srv/www/logs/access.log combines
#       Redirect / https://my-site.com/
</VirtualHost>
Later on, after we issue the ssl certificate, we will comment the DocumentRoot derivative and un-comment the Redirect. Save the file and make sure that the Apache configuration file is including this file:
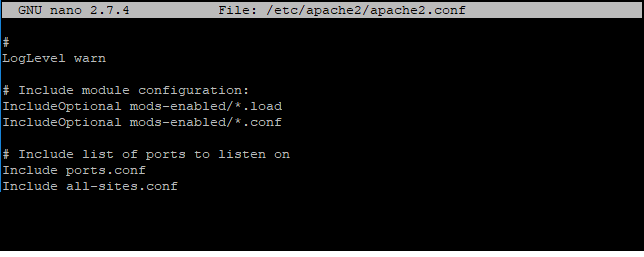
sudo nano /etc/apache2/apache.conf
And add to it:
Include all-sites.conf
This is how it looks:
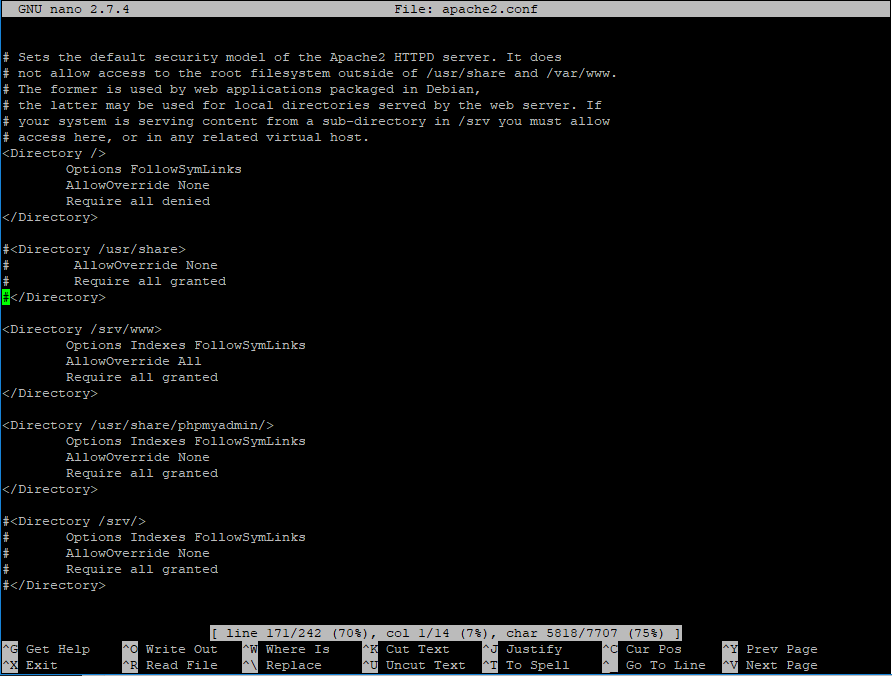
The <Directory> directive is allowing Apache access to the disk folders. As we changed the default sites from /var/www to /srv/www – you need to update this directive to reflect the change. Comment the default settings and the right directives as follows:
<Directory />
        Options FollowSymLinks
        AllowOverride None
        Require all denied
</Directory>

#<Directory /usr/share>
#        AllowOverride None
#        Require all granted
#</Directory>

<Directory /srv/www>
        Options Indexes FollowSymLinks
        AllowOverride All
        Require all granted
</Directory>

<Directory /usr/share/phpmyadmin/>
        Options Indexes FollowSymLinks
        AllowOverride None
        Require all granted
</Directory>

#<Directory /srv/>
#       Options Indexes FollowSymLinks
#       AllowOverride None
#       Require all granted
#</Directory>
The last un-commented lines allow Apache to access to /usr/share/phpmyadmin folder which is the folder where this app is hosted.
It looks like that:
Save the file, and restart Apache:
sudo /etc/init.d/apache2 restart
Step 5: issue the SSL certificate
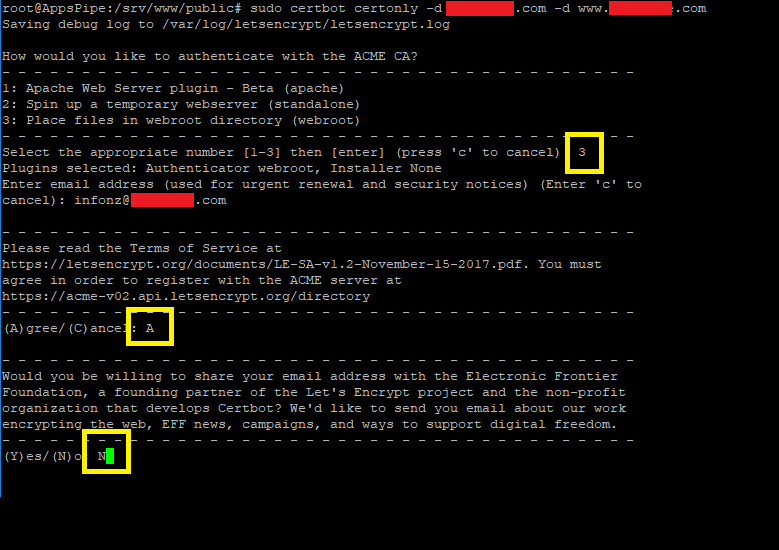
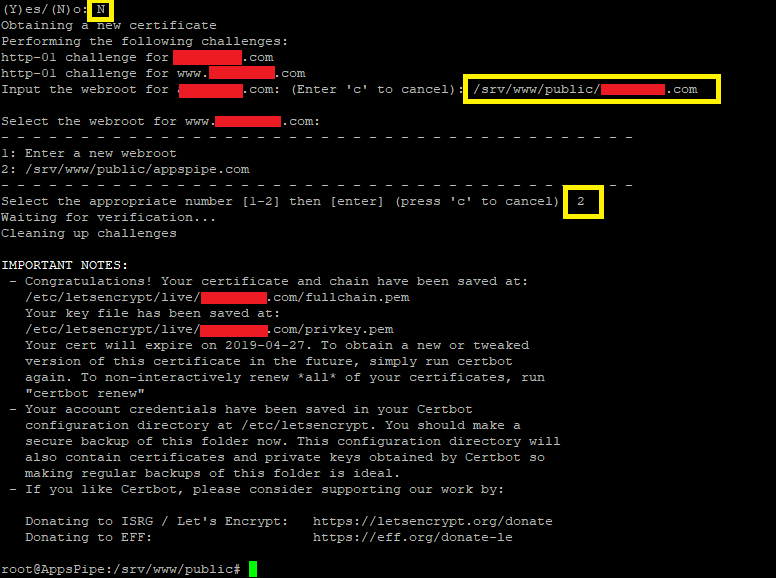
To issue the ssl certificate, run the certbot command (see my LAMP guide to see how to install certbot in case you don’t have it). The certbot command can issue a certificate for several hosts, in our case – the my-site.com host and the www.my-site.com host. Issue the certificate by entering:
sudo certbot certonly -d my-site.com -d www.my-site.com
Follow the instructions on the screen:
- choose to save the certificate in the root folder,
- if this is your first time to issue a certificate from that server, enter your Email
- then enter the site folder address and the domain alias folder address (same folder).
This is how it looks – I masked the domain name with red squares and highlighted with a yellow box the answers for the input questions:
step 6: configure the https site
Now create a new file /etc/apache2/all-sites-ssl.conf:
sudo nano /etc/apache2/all-sites-ssl.conf
And enter the SSL virtual host configuration:
<VirtualHost 100.200.300.400:443>
   DocumentRoot "/srv/www/public/my-site.com"
   ServerName my-site.com
   ServerAlias www.my-site.com
   ServerAdmin info@my-site.com
   SSLEngine on
#   ErrorLog "/srv/www/logs/error.log"
#   CustomLog "/srv/www/logs/access.log" combined
   SSLCertificateFile /etc/letsencrypt/live/my-site.com/cert.pem
   SSLCertificateKeyFile /etc/letsencrypt/live/my-sitet.com/privkey.pem
   Include /etc/letsencrypt/options-ssl-apache.conf
   SSLCertificateChainFile /etc/letsencrypt/live/my-site.com/chain.pem
</VirtualHost>
Save the file and edit the /etc/apache2/apache.conf file to include the /etc/apache2/all-sites-ssl.conf:
sudo nano /etc/apache2/apache.conf
And add to it:
Include all-sites-ssl.conf
This is how it looks:

Now change the /etc/apache2/all-sites.conf file to redirect the http requests to the https site:
Edit the file:
nano /etc/apache2/all-sites.conf
And change it to:
<VirtualHost 100.200.300.400:80>
#       DocumentRoot /srv/www/public/my-site.com
        ServerName my-site.com
        ServerAlias www.my-site.com
        ServerAdmin info@my-site.com
#       ErrorLog /srv/www/logs/error.log
#       CustomLog /srv/www/logs/access.log combines
        Redirect / https://my-site.com/
</VirtualHost>
step 7: restart apache
sudo /etc/init.d/apache2 restart
Step 8: setup a cronjob to automatically extend SSL certificates
LetsEncrypt has got an automatic certificate renewal process, just enter your crontab:
sudo crontab -e
add the following line to your cronjob tabs:
* 7,19 * * * certbot renew
Congratulations! You are done!
test your server installation by going to the address https://www.my-site.com