Add a new sender domain to an existing POSTFIX mail server – a step by step guide
In this guide we will add, step by step, a new domain sender to an existing POSTFIX mail server: say your existing server is sending emails on behalf of example.com domain [the manual to setup such a mail server is here], and you wanted to add a new sender server new-server.com :
Edit the signing table /etc/opendkim/signing.table with your favorite editor:
sudo nano /etc/opendkim/signing.table
And add to it the following line:
*@new-server.com sendonly._domainkey.new-server.com
Save the file and move on to editing the key.table file at /etc/opendkim/key.table :
sudo nano /etc/opendkim/key.table
and fill the contents with the following:
sendonly._domainkey.new-server.com new-server.com:sendonly:/etc/opendkim/keys/new-server.com/sendonly.private
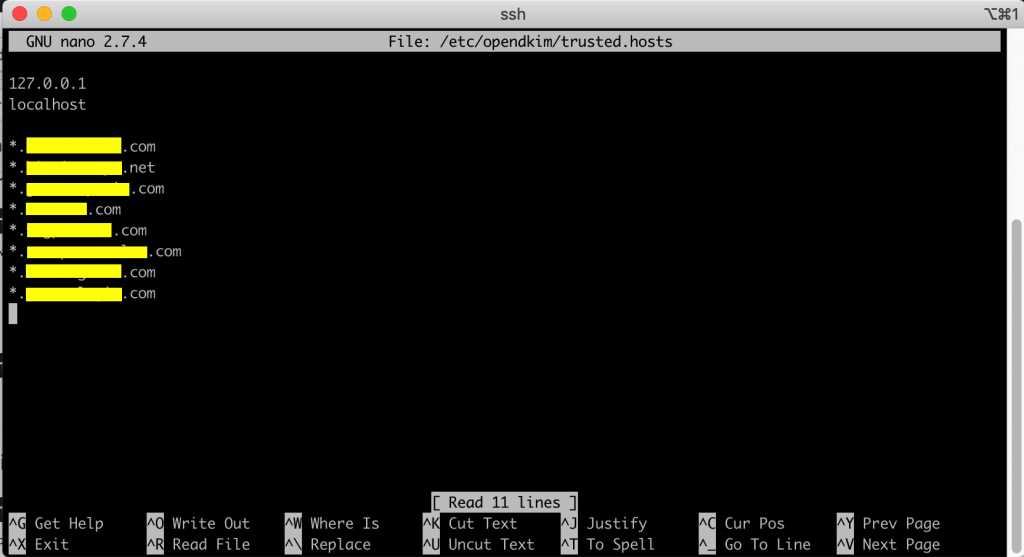
Save and exit that file and finally open the trusted.hosts file at /etc/opendkim/trusted.hosts :
sudo nano /etc/opendkim/trusted.hosts
and add the following line in the end of it:
*.new-server.com
Since we got a list of domains on that server, it should look like this:
We now need to generate a private key to sign outgoing emails and a public key for receiving SMTP servers to verify the DKIM signature. The public key will be published in the DNS settings for your domain(s). Perform the following for each domain you wish to send on behalf of:
Create a separate folder for the domain you want to generate keys for (replacing example.com with your domain):
sudo mkdir /etc/opendkim/keys/new-server.com
Then generate the keys for the new domain using:
sudo opendkim-genkey -b 2048 -d new-server.com -D /etc/opendkim/keys/new-server.com -s sendonly -v

sudo chown opendkim:opendkim /etc/opendkim/keys/new-server.com/sendonly.private
Note that sendonly is still the selector here. This will be the prefix of _domainkey in our DNS record. Now display the public key and make sure to add it to the DNS record:
sudo cat /etc/opendkim/keys/new-server.com/sendonly.txt
This will print an unholy amount of unnecessary information as our domain provider namecheap manages the formatting for us. It gives an output like the following:
sendonly._domainkey IN TXT ( "v=DKIM1; h=sha256; k=rsa; "
"p=MIIBIjANBgkqhkiG9w0BAQEFAAOCAQ8AMIIBCgKCAQEAwVVC8RGSynFIN18JekVJlstZif
u1BZG85y8F4Ir/IJ5Uvmjk3kTG0fFpckCogWFUYKtWonnDpokdJ2RiH5xZGQ56/C6D6Ms3wkkuL4n47
2DkJLXEHwOkv44acF7eA9sBm+lM+T4OHsKmopfmpTf2Kv20WmgCGZO46w+14eRmGWz7yr94OwF6a8Py
xdz5mGheOItnywLHgM8OoT"
"xkFqwruvVP0X/RKNh/ehDBZRk3fW0I5MD+iHT2+sReNH4jjQRiMp6weVvn3FDo3UdpwKAGZs
eRCdP0ZZ1+W5KJ8usIuyLeVSiOUCH+COAo5sKVergj3UgN8279thgsiX+Wi86QOQIDAQAB" ) ; --
--- DKIM key sendonly for new-server.com
In the above example, we see that we need to set a TXT record in our DNS settings for the domain new-server.com with the host of sendonly._domainkey and the value then needs to be formatted like the following:
v=DKIM1; h=sha256; k=rsa; p=MIIBIjANBgkqhkiG9w0BAQEFAAOCAQ8AMIIBCgKCAQEAwVVC8RGSynFIN18JekVJlstZifu1BZG85y8F4Ir/IJ5Uvmjk3kTG0fFpckCogWFUYKtWonnDpokdJ2RiH5xZGQ56/C6D6Ms3wkkuL4n472DkJLXEHwOkv44acF7eA9sBm+lM+T4OHsKmopfmpTf2Kv20WmgCGZO46w+14eRmGWz7yr94OwF6a8Pyxdz5mGheOItnywLHgM8OoTxkFqwruvVP0X/RKNh/ehDBZRk3fW0I5MD+iHT2+sReNH4jjQRiMp6weVvn3FDo3UdpwKAGZseRCdP0ZZ1+W5KJ8usIuyLeVSiOUCH+COAo5sKVergj3UgN8279thgsiX+Wi86QOQIDAQAB
To export the TXT record you can use:
sudo cat /etc/opendkim/keys/new-server.com/sendonly.txt >> new-server.txt
Notice how the value of the DNS record was the text between the brackets ( ) but with quotation marks removed and the line breaks removed as well. Once this has been set in the DNS record for the domain, you should be able to test that the key is properly set with the command:
sudo opendkim-testkey -d new-server.com -s sendonly -vvv
Note that you may have to wait for the DNS records to be propagated beforehand (set your TTL for the TXT record to 1min if you want it done quickly). If you see key not secure message, don’t panic. This is because DNSSEC isn’t enabled on the domain name.
Setting up DMARC record
To set the DMARC record, enter the following as the value for a TXT record into your DNS settings for your domain:
v=DMARC1; p=quarantine
With the host as _dmarc .
Setting up SPF record
If you want to send email as another domain or subdomain, say example.net or mail.example.com, you’ll need to let example.net know that you are going to be sending mail as example.net but from example.com. This is done using an SPF record for example.net that specifies the IP address and hostname that the host of example.com. In the case of mail.examople.com to be the sender for other domains:
Set TXT record with host @ and value:
v=spf1 ip4:111.222.333.444 ip4:555.666.777.888 a:mail.example.com include:mail.example.com include:_spf.google.com ~all
Restart
Now restart opendkim, Postfix and Dovecot with:
sudo systemctl restart opendkim postfix
sudo systemctl restart dovecot
Finally test an email using the swaks tool (it should be installed if you followed the setup guide), send an email to yourself using:
swaks --to yourself@uour-domain.com --from info@new-server.com --server localhost
Once you received the Email, view the source of the email to see the security level of the mail.
Note: if you plan to accept emails for this domain (inbound emails) – you need to add this domain to virtual_alias_domains in /etc/postfix/main.cf